Caution! Be sure always have power off to the motors when changing the connections! Failing to do so will kill the TinyG.
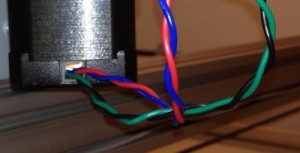
Use four core shielded cable, 0.5mm2 (AWG20) or heavier. The stepper motors are electrically noisy! I used Farnell/Newark/Element14 part number 1891252 cable. Use shielded cable, and connect the shield to gnd on TinyG side and to the frame of the machine on machine side. You need to have a terminal block or something like that between the motor cable and the wires from the motor. To further combat noise, twist the coil pair wires from the motor around each other, like this:
Using Motors Supplied with the Kit
Wire the X-motor (the motor on the moving bar) to TinyG Motor1 as follows:
| green | A1 |
| black | A2 |
| red | B1 |
| blue | B2 |
Y-motor (in the back corner), to TinyG Motor2:
| blue | A1 |
| red | A2 |
| green | B1 |
| black | B2 |
Threaded rod Z motor goes to TinyG Motor3:
| green | A1 |
| yellow | A2 |
| red | B1 |
| grey | B2 |
And finally, the small rotation (A) motor connects to TinyG Motor4 as follows:
| green | A1 |
| black | A2 |
| blue | B1 |
| red | B2 |
Using Other Motors
So, you are building your own version of the LitePlacer? Cool! Please share your experience on the forum.
Identifying Stepper Motor Coil Pairs
Use bipolar (four wires) stepper motors. There are two coils in a motor, both ends wired out, so four wires total. First, you need to identify the coils of the motor. A “pair” means the wires from the each end of a same coil. Common convention is red and blue are a pair, and so are green and black. Check with an Ohm meter: a pair conducts, wires that are not a pair don’t. Connect the pairs to A1-A2 and B1-B2 on the TinyG.
Motor reference
The A motor is StepperOnline model 14HM08-0504S. The X and Y motors are StepperOnline model 17HM19-2004S (or 17HM19-2004S1, depending on availability). the Z motor is RobotDigg 17HS3001-150N.
