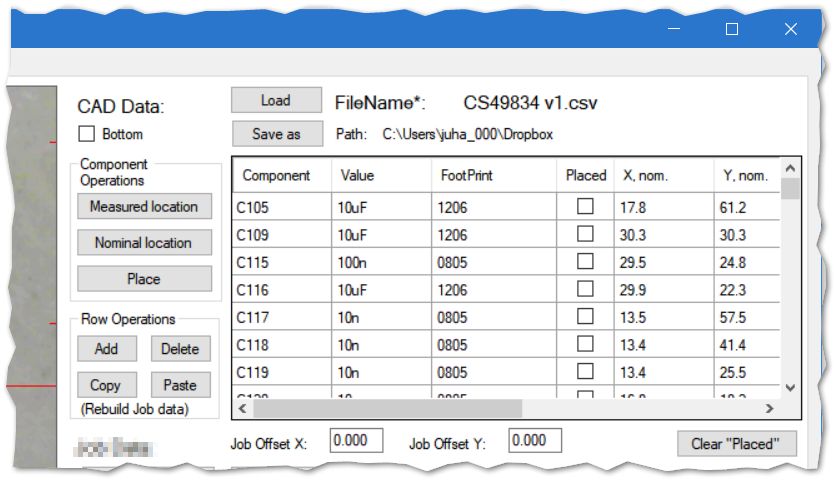
This is where you use your CAD data.

“Load” button loads the data. The * at the end of FileName tag indicates that this version is remembered from last time you used the program, and doesn’t necessarily reflect the file on the disk.
The data comes from your PCB design program. Almost all programs output the data in csv format text file. The details differ somewhat between software packages, but the LitePlacer software reads in most of them. (If it doesn’t read in the format you are using, please email! I’ll be happy to include it to the software). The accepted format of the CAD data file is documented here.
“Bottom” checkbox indicates, that the file you loaded was one layer data that represents the bottom layer of a board.
“Save as” saves a (potentially modified) copy of the data.
The columns of the table are:
- Component: Also called designator, unique name for a component, such as “R1” or “C12”.
- Value: Such as “10n” for a capacitor or “10k” for a resistor
- Footprint: What package the part comes in. All three come from your CAD data file.
- Placed checkbox: Indicates if this part is already placed. If it is, further operations skip it. The “Clear “Placed”” button resets those.
- X, nom; Y, nom; rotation: Nominal coordinates for part centers. The board origin at your design program is supposed to be at low left corner, and part coordinates are calculated from that.(Last one is not visible unless you scroll)
- X, machine; Y, machine; Rotation, machine: These columns are filled when the position of the components in machine coordinates are measured. See this page.
Component Operations:
“Measured Location“: Moves the camera over the selected component and displays its orientation. This should be accurate.
“Nominal Location“: Moves the camera over components nominal location, which is nominal coordinates added to PCB zero location. This is approximate. This is useful to check that the data loaded and the PCB that is on the table match.
“Place“: Picks up and places this part. Some items need to be set up correctly for this to work. Please see other parts of the documentation.
Row Operations
These allow you to edit or build the data table in place. The “rebuild job data” reminds you, that using the buttons or editing the data in the table, makes the job data section outdated, you need to rebuild it before using it.
“Job Offset X & Y” are for cases, when the origin of your design is not at the low left corner. These numbers will be added to X and Y data before use.
“Clear “Placed”” button resets all Placed checkboxes.