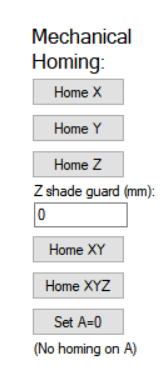
The term “homing” means finding the workspace origin. Before the software can do accurate homing using vision processing, the machine needs to be homed on mechanical level. This is done using limit switches at the end of the travel on each axis. The operation normally happens automatically, but for setup and testing, we want to be able to do it manually as well. The switches need to be connected correctly, and enabled on the axes setup tabs.
The mechanical zero position for X is front. For Y, it is left and for Z, it is up.
When you click on the above buttons, the axis or axes should start to move towards zero position, using homing speed and acceleration. When the switch is triggered, the machine should decelerate, stop and move back a small amount to clear the switch.
Z shade guard
This feature is normally not needed. However, some setups have elaborate shade arrangement around the nozzle, which can interfere on the left side Y belt. If the number here is other than zero and the software does full homing (“Home” button on the bottom), the z axis is first homed. Then the Y axis is homed. Then z axis is lowered by this amount to make room for the shade, and then X axis is homed. Finally, the machine is moved to (10,10) so that the shade doesn’t hit the belt before raising Z to full height.
Rotation homing
There is no homing switch on A (rotation) axis. However, for best and repeatable results, the rotation axis should be homed also. To achieve this, the software aims to leave the A axis at zero position. For this to be reliable, make a mark on the big pulley so that you can see the axis position. Make it a habit to look at the pulley before powering on the machine, and if the mark is not pointing to your zero location, turn the axis by hand.
During setup and tuning, the “Set A=0” makes the A coordinate to be 0 degrees. No movement will happen.
Homing details for TinyG board:
When an axis is homed on a TinyG board, the axis first moves towards the switch. When the switch is triggered, the machine will first back off slowly to clear the switch. Then, it moves back somewhat more, to go to the mechanical homing position. The parameters for this are stored internally on the board EEPROM. Normally, you don’t have a need to tune these, and there is no interface on the software to do that. In case you want to change the behaviour, the parameters are:
xlv = x latch velocity: The slow speed of the first move back, default 500mm/min.
xlb = x latch backoff: The distance of the first move back, to clear the switch [I’m not sure about the factory default]
xzb = x zero backoff: The distance of the second move back
The speed of the second move is the homing speed.
To change a parameter, send text $[parameter]=[value]. For example, to increase the first move distance for x axis, send text
$xlv=8
For other axis, substitute the ‘x’ with y or z.
On TinyG board when homing multiple axis (“Home XY”, “Home XYZ”), the axis home one by one: First Z, then X and last Y.
