I've seen any number of different tape tray ideas presented. Is there any consensus on what works best?
Double-stick taping the parts to the table : - ?
Thanks - I like what I've seen from Malte-Randt.de so far
SMD Parts Tray Shoot Out: Who's the Winner?
-
mcbPalisade
- Posts: 7
- Joined: Tue Jan 02, 2018 2:29 pm
Re: SMD Parts Tray Shoot Out: Who's the Winner?
I'm watching this thread for an answer... Just received my kit.
-
mcbPalisade
- Posts: 7
- Joined: Tue Jan 02, 2018 2:29 pm
Re: SMD Parts Tray Shoot Out: Who's the Winner?
I don't know right now about different heights of different trays. If it doesn't matter (not into it that far yet) then these will work great for 8mm paper tape parts. Won't work for [most] black plastic parts because they hang down a lot.
Not knowing for sure I'm printing 3D holders for parts in white tape out of black material and vice versa.
Not knowing for sure I'm printing 3D holders for parts in white tape out of black material and vice versa.
- Attachments
-
- Paper Tape Holddown.PNG (25.4 KiB) Viewed 17638 times
Re: SMD Parts Tray Shoot Out: Who's the Winner?
mcbPalisade,
Let me know how this works... I am a good ways away from being able to test the machine.
Thanks,
Mike
Let me know how this works... I am a good ways away from being able to test the machine.
Thanks,
Mike

Re: SMD Parts Tray Shoot Out: Who's the Winner?
I'm playing with part holders like the one shown in an earlier post but with a pocket to hold deeper components. I'm sizing the pocket almost on a per part basis. A typical cross-section is
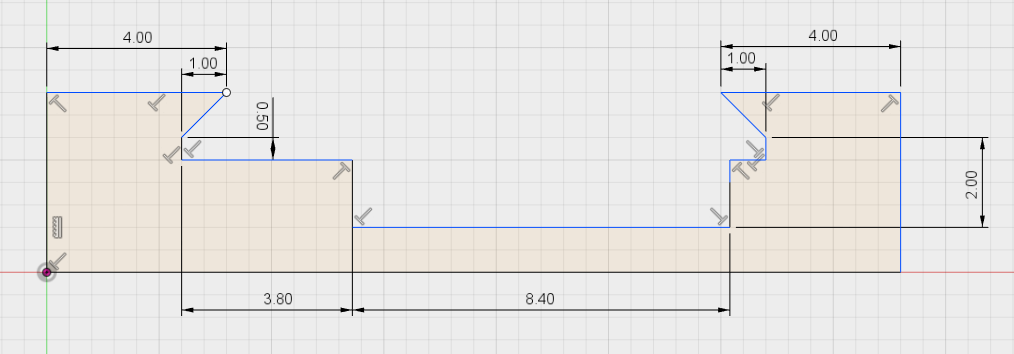
I'm using Fusion 360 and can make the design files available if anyone wants them but they are not rocket science.
I'm using Fusion 360 and can make the design files available if anyone wants them but they are not rocket science.
Grahame
Re: SMD Parts Tray Shoot Out: Who's the Winner?
It does matter though. If you want to use downcam to find the strips, you should make sure to have them in the same plane as the PCB surface.mcbPalisade wrote:I don't know right now about different heights of different trays. If it doesn't matter (not into it that far yet) then these will work great for 8mm paper tape parts.
Reason is that both camera focus and projected size of image depend on the distance between lense and object. If a part is further away, it appears smaller and the other way round.
Camera will be "calibrated" so software can convert pixels measured in image to distance (mm) in real life. However, for the reasons above, this conversion is only valid for one specific distance from lense.
Juha kind of works "around" this by iteratively centering above circles (kind of homing in) but it is faster and more accurate if everything is in the same plane or on same Z-level if you like.
If you intend to use OpenPNP, then this is a must have. Usually it means raising both PCB with holders and parts, especially with embossed tape.
You should use a color that contrasts with both black and white tape. Clear tape is tricky anyways. Blue or green works well.mcbPalisade wrote:Won't work for [most] black plastic parts because they hang down a lot.
If you don't want to buy other filament, you can also paint the part below the tape sprocket holes.
Regarding "my" feeders / strip holders: I still use them a lot but have done away with the tray. I lined my table top with a sheet of magnetic stainless steel (there is another thread about this; see viewtopic.php?f=3&t=179&start=10#p8995).mcbPalisade wrote:Thanks - I like what I've seen from Malte-Randt.de so far
I am now attaching the strip holders directly to the table top - without the index pins at the bottom, obviously
Re: SMD Parts Tray Shoot Out: Who's the Winner?
Hello Malte,mrandt wrote: I am now attaching the strip holders directly to the table top - without the index pins at the bottom, obviously
I am using your holder WITH index pins. I drilled a full grid of holes using a 3d printed drill template leading to 4 rows with 3 of your trays.
This leads to very reproducible positions so when I replace a holder they are always at the same location and therefore also the tape definitions stay "in place".
How do you handle the "relocation offset"?
best regards
Manfred
Manfred
Re: SMD Parts Tray Shoot Out: Who's the Winner?
Hi Manfred.
 At the moment I am only doing small jobs, so I have to teach component locations anyways. The idea of the trays was to swap all the parts needed for the job in one go - like an instant refill. But as said before, I currently don't have that need.
I want to toss in another strip feeder: Michael from OpenPNP forum has created a very nice parametric model for place holders, which are simpler than mine but still work great:
https://docs.mgrl.de/maschine:pickandpl ... ualfeeders
You can configure individual lengths, tape widhts etc. either in oSCAD or Thingiverse Customizer - really cool.
On a side note: I am also looking into automatic feeders. My plan is to auto-feed common parts (like those ubiquitius 100n caps or 10k resistors and others I use in almost every design) from reels and only have the special parts in trays or strip holders.
I want it to be fully automatic (no lever pushing with PnP head or similar) and also peel the tape. So far I have found three promising projects:
1) Michael's auto feeder, mostly 3D printed, using cheap servo and dc motor - and ready to download incl. BOM:
https://docs.mgrl.de/maschine:pickandpl ... 0816feeder
2) Hans Jørgen's auto feeder, interesting design where the housing is made from PCB, few 3D printed parts and dc motors - work in progress:
https://blog.exploratory.engineering/post/feeder/
3) Pham's auto feeder, made from laser cut acrylic and servos, using a funny idea (piece of string) to couple motor and lever - mostly finished design, might need some tweaking:
https://github.com/openpnp/mica-feeder
I have considered drilling holes into the table surface to do the same - but have not done it yet.mawa wrote:I am using your holder WITH index pins. I drilled a full grid of holes using a 3d printed drill template leading to 4 rows with 3 of your trays.
Simple answer: Notmawa wrote:How do you handle the "relocation offset"?
I want to toss in another strip feeder: Michael from OpenPNP forum has created a very nice parametric model for place holders, which are simpler than mine but still work great:
https://docs.mgrl.de/maschine:pickandpl ... ualfeeders
You can configure individual lengths, tape widhts etc. either in oSCAD or Thingiverse Customizer - really cool.
On a side note: I am also looking into automatic feeders. My plan is to auto-feed common parts (like those ubiquitius 100n caps or 10k resistors and others I use in almost every design) from reels and only have the special parts in trays or strip holders.
I want it to be fully automatic (no lever pushing with PnP head or similar) and also peel the tape. So far I have found three promising projects:
1) Michael's auto feeder, mostly 3D printed, using cheap servo and dc motor - and ready to download incl. BOM:
https://docs.mgrl.de/maschine:pickandpl ... 0816feeder
2) Hans Jørgen's auto feeder, interesting design where the housing is made from PCB, few 3D printed parts and dc motors - work in progress:
https://blog.exploratory.engineering/post/feeder/
3) Pham's auto feeder, made from laser cut acrylic and servos, using a funny idea (piece of string) to couple motor and lever - mostly finished design, might need some tweaking:
https://github.com/openpnp/mica-feeder
Re: SMD Parts Tray Shoot Out: Who's the Winner?
Actually, the iterative centering (usually not many iterations are needed) is to avoid the error that comes when you look to the target sideways. This will stay, as the first look is somewhat sideways anyway, until you are lucky and the first guess of the first guess of the location is spot-on. The same Z level requirement was for the same reason: If the camera looks sideways, the hole position in xy plane depends on the z level of the target.mrandt wrote: Juha kind of works "around" this by iteratively centering above circles (kind of homing in) but it is faster and more accurate if everything is in the same plane or on same Z-level if you like.
The new high resolution cameras (announced today) have adjustable camera mounts. Now, when a camera looks directly down, the Z height does not matter that much, if measuring from tape holes. If you use tape holders, the hole looks larger, but it is at the same XY point, so the part is found at the same distance from the hole. What is left is the error from the nozzle not moving exactly vertical, but this too can be fixed: When the uplooking camera is looking straight up, we can measure the nozzle tip drift by Z coordinate, and do a 3d square correction. (This is not implemented yet, but I'll do it soon.)
Clear tape is tricky indeed. Depending on the tape and lights, you might be forced to use a thick felt tip pen on the holes before you take the cover tape off.You should use a color that contrasts with both black and white tape. Clear tape is tricky anyways. Blue or green works well.
-
robert@serve101.org
- Posts: 22
- Joined: Thu Jan 18, 2018 8:19 pm
Re: SMD Parts Tray Shoot Out: Who's the Winner?
- IMG_1527.JPG (3.32 MiB) Viewed 17400 times
Paper tapes include caps and resistors: 16 different values:
Four clear plastic tapes, these I fixed by making a very special tray system that includes registration holes so I do not have to use the limited contrast of the tape holes themselves. One of the part tapes is partly raised so you can see the depressions used to hold the parts in place.
Twelve parts on black plastic tape are mounted in grooves that are sized just right so the tapes are held without using any double-sided tape.
Lastly there are 8 parts placed in depressions sized to hold the parts in place for precision pickup.
Note also, the new high resolution camera are installed. Highly recommended, BTW.