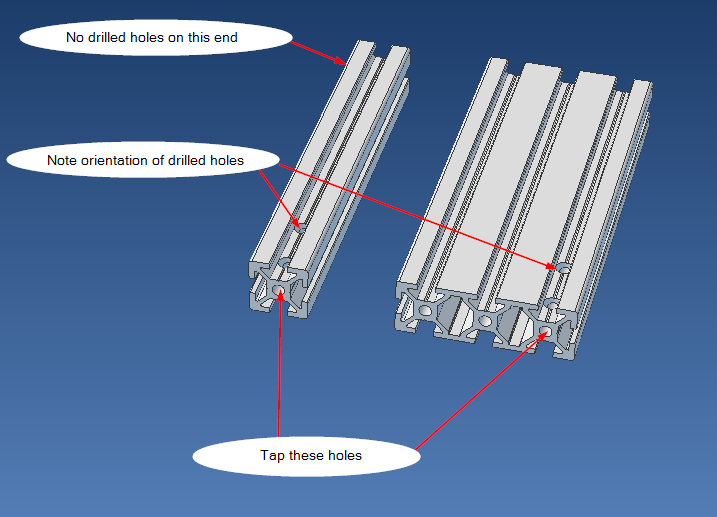
We’ll use HTJ5 self-tapping screws to attach pieces to the profiles. To make the assembly easier, pre-tap the holes using the self-tapping HTJ5 screws. To do so, take a power screwdriver and attach a Torx25 bit. Press the profile firmly to your table or use a vice. Be careful not to harm the V edges on the Makerslide! Take a HTJ5 self tapping screw, put a drop of oil on it and turn the screw to the hole as far as it goes. If it gets very tight, back up the screw a bit, clean the threads and try again. Remove the screw, unless told otherwise.
Change the screw after each tapping to avoid the cutting edges become dull.
Tap the following:
- On both 500mm MakerSlide pieces, both holes on both ends. It is not necessary to remove the screws, just back them off a few mm’s.
- On both 750mm MakerSlide pieces, both holes on both ends. Remove screws.
- The 250mm MakerSlide piece, both holes on both ends. Remove screws.
- One of the 767mm extrusion, both ends. You can leave the screws in. This will be the back extrusion of the frame; mark it with a post-it or similar.
- The three 53mm profiles, both ends. Remove screws.
- The 20×60 corner pillar, the hole indicated below. Remove screw.
- Take one of the two 20x20x140mm corner pillar which have only two drilled holes (one has an extra hole on the side). Tap the hole indicated below. The profile you tapped will become the front right pillar of the frame later; mark it with a post-it or similar. remove the screw, the threaded hole will be used to mount Y limit switch later.
You will now have small metal flakes on your work area, on the screws and on some of the parts. Clean these! You don’t want miniature stray metal pieces on an SMD machine!
