HD camera selection and mounting

UPDATE:

The blog post on this page is outdated. I now have 4k cameras, that are faster and of course, more accurate. The mount is re-designed so, that after adjusting, you can tight screws and lock it in place. Links to the design files are in this forum post.

Original blog:

Some time ago, I decided to change the cameras used with LitePlacer, as the manufacturing quality of the old type got progressively worse. So, first I started to look for the camera itself.

Selecting the camera

I had a few criteria for the camera. It needs to have a good image quality, preferably in HD. Also, the form factor should be such, that it is possible to design an adjustable mount (more of that below): Making the camera to look exactly down eliminates some errors and make variations in height less of an importance. It must be able to focus close. Price is a factor, but not the main one.

I looked to some manufactures, eBay and AliExpress. I bought 20+ samples of various types. Some were in unattractive form factor, such as camera used in laptops, very long strip. Some were very hard to focus. Some had horrible lens distortion when focused close. At the end, I selected the HBV-1517 module from Huiber:
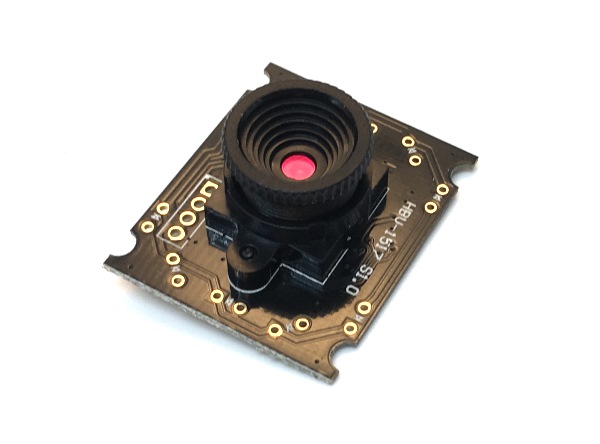
The form factor is nice. The focus needs adjustment and is not the most convenient, but it is ok; especially as in this application, it needs adjusting only once. The lens is deep in the focus ring, so it is easy to handle, without getting fingerprints on the lens. The image quality is great, with minimal lens distortion. Peculiarly, their one off sample price at AliExpress is less than quantity orders, but still, the sub-10$ price is nice. It is not particularly fast in high resolution (7.5fps at 1280*1024, 30fps at 800*600), but that is not the main speed factor anyway.

Designing the mount

Then, I designed the adjustable mount. For this application, the mount does not need to be fully adjustable; it is fine if the left-right tilt, front-back tilt and rotation adjustments are all just trims with sufficient range. Still, three way adjustment is not trivial. So, I’m writing this hoping that my design can inspire other people in their projects.

First, I came up with a camera holder:
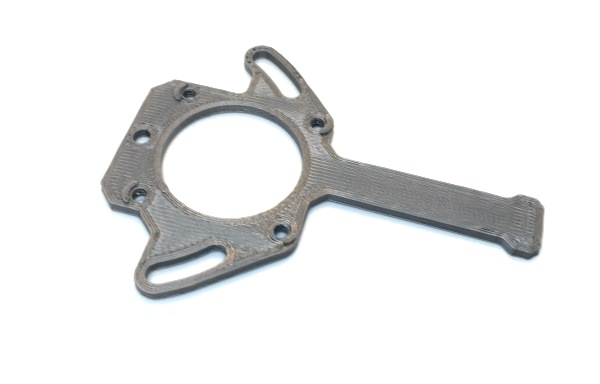
The long lever is the rotation adjustment and the place where the USB cable will be attached to form a strain relief. Note the small ridges around the four small holes around the round opening.

The camera module is screwed to this, using nylon washers to press the module down:
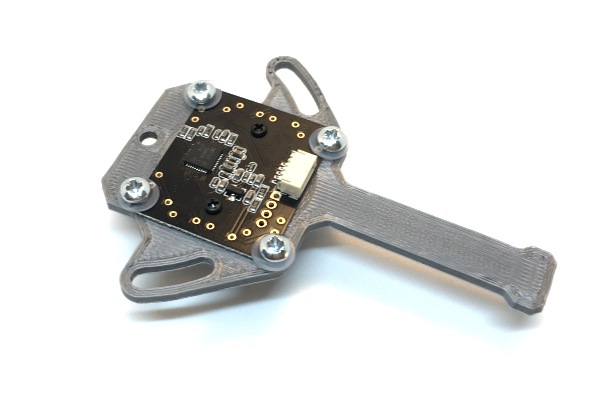
I used self-taping screws, Element14 part 2474936. Using self-tapping screws on 3D-printed parts is handy in assembly, but rather picky in design: The hole size needs to be exactly right for the screw to make a thread and get a good grip, but not break the part, especially in small sizes. Fortunately prototyping with 3D printer is easy.

Then comes a part to hold these:

The cat-looking opening is for the camera, and the “ears” and “whiskers” of the cat are where the camera module screw ends go, allowing the left-right trimming. The parts are screwed together; the assembly turns around the screws on the back, and the screws on the side hold the assembly together. These will be tightened once the user is happy with the rotation adjustment.
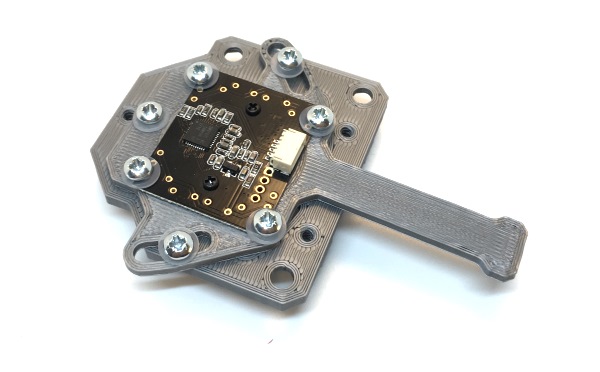
Turn this around:
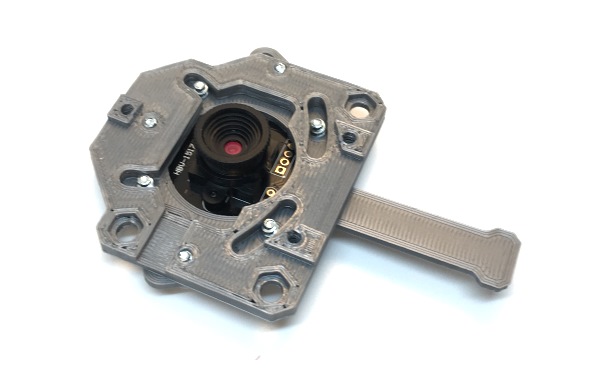
And install a LED ring light, again using washers to hold it in place:
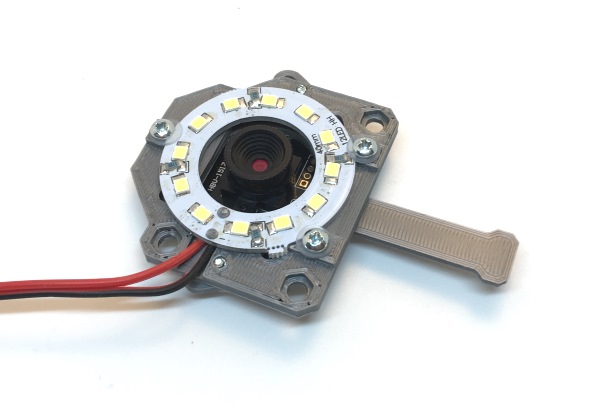
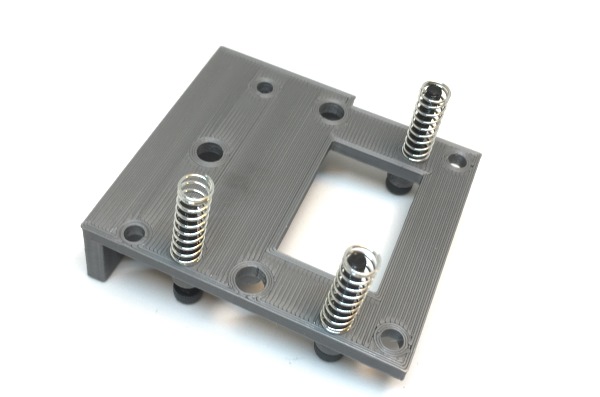
Note the hex shaped retractions. Finally, we need yet another part to attach this to the machine itself. Here is the actual mount, upside down, with three screws installed. Also, the screws have springs put on them:
Then, the whole thing is put together:
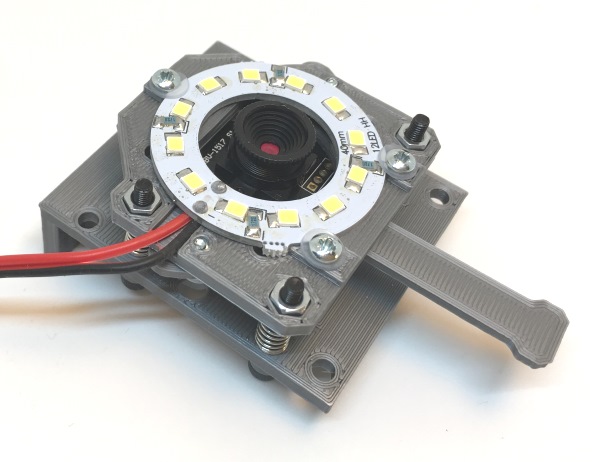
The camera module has now a three point straight angle mount. The closest screw is the base, that is not adjusted. The screw at upper right adjusts the left-right skew of the camera angle, without affecting the front-back adjustment. The front-back angle is adjusted with the screw close to the LED wires outlet.

Here is the whole thing mounted on the machine. You can see a slotted plate that allows for height adjustment and a light diffuser assembly below the camera module assembly. The latter is just a rectangular holder for light diffusing films, mounted with standoffs to the corners of the camera assembly (image is taken from the assembly instructions).
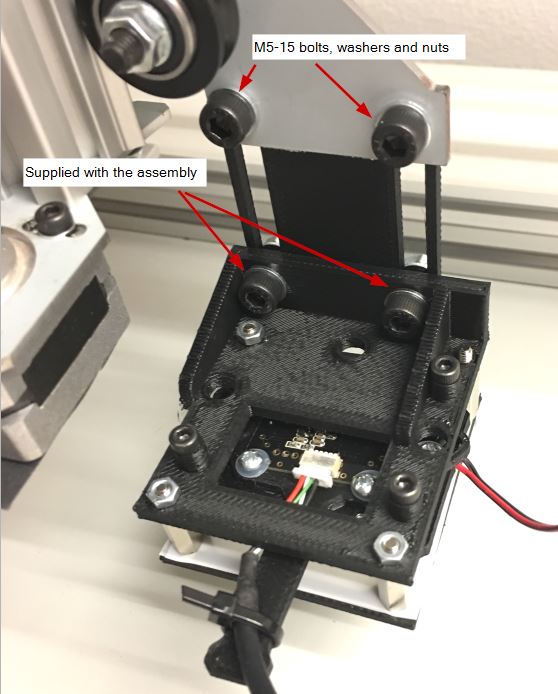
The up camera assembly follows the same principles, but naturally, is not the same – but you get the idea!

Open source

My STLs are unlikely to be of use for you. As noted, the screw hole size is tricky, and depends on the printer, its setup, the filament and printing temperature. Most likely, the hole size I use is not suitable for your printer. Besides, you want to adapt the design for your machine and your camera module anyway. But here they are anyway:

Up looking camera STLs (not show in this post)

Down looking camera STLs (the subject of this post)

Much more likely to be useful are the 3D CAD designs. These are made using Fusion 360:

Up looking camera CAD design

Down looking camera CAD design

Comments (please!)

I very much appreciate feedback and comments, especially if you find this post useful (After all, that is why I wrote this!). Please add your comments to my forum thread. If you prefer not to sign up but still want to share, email to me (juha at liteplacer.com) with permission to add to the forum is fine, too. Also, there is a thread at OpenPnP forum, too.
FedEx customer service is getting ridiculously good

I’ve praised FedEx before, but they still managed to overdo themselves. My contact person and the Finland country manager paid visit to me. I joked about the lazy and incompetent house lord (me) that had not done the snow work for visitors early in the morning. When the guys left, they plowed the snow from my walkway and stairs to the street!

What is on my todo list on the software?

I haven’t written much lately, shame on me! Anyway, this has been asked several times, so I’ll write the answer to here as well. So, what are my near term plans for the software? Bug fixes will get priority over new features, but here is my new stuff todo list, before feedback from this post, in the order of importance:

I am adding functions to the software, so I didn’t get to do a stable public release during the weekend, as I hoped. Once the new functions are stable (or at least don’t interfere with the current functionality so that the interface to those can be hidden without ill effects), the very next release will have support to 32mm tapes as well as yet another attempt to have a robust camera startup routine that is stable on all Windows and .NET versions.

Then, support for tape definitions not on the built in list, custom trays, feeders, trays and part jigs. I anticipate that IC placement will greatly improve when the pickup location can be accurately defined.

Placed / not yet placed information to jobs, as well as option to continue on error and making a list of failed components, if any.

Measure everything at the start of a job. This way, you can stay at the machine until it has all the the info a job needs and then walk away knowing, that a job will not fail in the middle to a failed measurement.

The “everything visible” style UI was clear (imo) when the software was released but is getting more and more cluttered when new functions are added. It needs a rearrangement, most likely resulting to a traditional menu bar and setup screens.

Some folks have machines with the capability of automated nozzle change, with different implementations. (I don’t, yet.) These should somehow be supported by the software. This has its own discussion thread here.

Due to spammers, commenting on my blog is disabled. (Do those folks really believe that my blog is widely read and they can get any audience between the time they post their spam and I get to remove the posts? Well, I guess the bots don’t care…) However, you can add your views either by registering on my forum and participating to this thread or by sending me email.

Experiences with Chinese manufacturing and selling business

This blog is about the nature of Chinese manufacturing and selling business and how it appears and affects to small players outside China.

I haven’t travelled to China to arrange buying materials and parts for the machine; this is not big enough business to justify that. On some items, I have to go through dealers, which can make life difficult. The Ebay and Alibaba stores seem to come and go, and even the more stable dealers don’t get exactly the same item repeatedly. Running a small business myself, I understand them very well: If the item has the same description and specifications, there is little point making sure it is exactly the same – but the devil is in the details.

On some items I get or must to deal with the factories directly. I found out this the hard way: For example, if you have followed the story closely enough, you would have noticed that the type of chain kit has changed. I bought lots of different type of chains to find the best choice. After I decided which chain to use, I ordered plate set and chains for the first lot. When I got the chains, they were slightly different than my samples. That mishap was correctable by modifying the attachment piece. Although usable, the result was not at the quality I was aiming for. I didn’t want to scrap usable chains, but I didn’t want to sell them either. I ended up sending free chains with the first machine.

Next time I wasn’t so lucky. I redesigned the plate set to match the chains. The chains I got that time did not fit, no matter what. They did sort of fit the description in the on-line store, however. The local hackerspace got more chains than their robot and 3D printer projects needs and a metal recycling place got 20kg of steel. Bummer.

I can’t re-design and re-manufacture the laser cut plate set again every time I buy more chains to the store! So, I had to locate a factory that wants to deal with me directly, so I can keep getting exactly the item again. Fortunately I had the money and the storage room for a year (or more) cables for my store.

Lesson learned: It seems to be rather difficult to buy the same exact item again from China, especially when the item is considered to be a commodity. And in China, items that here would get a type number and a stable specification sheet can still be commodity items.

At the time of writing this, I’ve bought three lots of cameras. The store I first used is no more, and even though the description and appearance of the cameras in another store are exactly the same, the products are not. The USB identification string of the cameras changed a little. This did not make a difference in my application, but it is easy to imagine an application where it would.

What made a difference is that the “10mm outer diameter” specification is rather loose and different enough. Today, I had to add a note to instructions to use a piece of tape if the cameras don’t fit tightly to the holders. I’m not too happy about the situation, but I hope my customers agree the above to be a reasonable workaround in this case.

On the other hand, I knew this: I have been in high end audio business, and I know all too well that not all “10nF, size 1206, NP0” capacitors or even 10k resistors are the same, when you apply parts so that the unspecified characteristics (like above, the tolerance of 10mm) actually do matter.

About Leadership (FedEx Finland is great)

I’m shipping my stuff using FedEx. My experiences are therefore mostly with FedEx Finland and whatever is happening in FedEx international offices, gets filtered by their Finland office. So, I can comment only from FedEx Finland office actions, but they do deserve a comment.

As I see it, this has to come from the top. Obviously, FedEx Finland management is doing something very right and maybe, hopefully, the origin is at the very top of FedEx management. So, here is my statement:

FedEx Finland has the best customer service I know of, and this is true no matter who is taking care of me. The driver I meet regularly is a happy person and never seems to have a bad day. Whenever I call or send email to FedEx, I always get my point through, and never, ever get a response “I can’t do anything” or “this is how the system works”. Even when an error is on my side and it is me that caused extra work for them, the issue is taken care of and I feel as a respected customer. It is very nice to be dealing with a company where customer service goes to 11.

So, anybody know what FedEx is doing to make the whole company to behave like that?

Wearing Many Hats

This is a small business. Mainly a one-person operation, although I do have some help every now and then and use subcontracting a lot. I do find the versatility of the tasks refreshing and fun. At some point, I’m implementing state-of-the art algorithms (some pieces of the LitePlacer software are from fresh doctorate thesis), and the whole software is a high-tech assignment. There are also mechanical design, although not recently. Lots of customer communication, which I enjoy. Also stock management, cash management, web site building, web shop management and sometimes, almost brain-less packing, floor cleaning and taking out the trash.

I like wearing many hats during a day. I also understand why some people with a different mindset would hate it. As a sample of my typical day, here is what I’m doing today:

I started the morning by taking and editing photos about some new additions to the web shop, wearing the hat of a photographer and graphics designer. Then, I added the products to the shop, playing as a web master for a while:

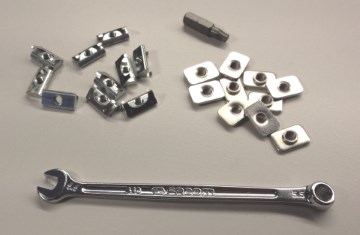
nuts and wrench small

Then I talked to my accountant, being the financial officer for a while. I also talked to the print shop, being the marketing manager. I guess writing a blog post is kind of marketing, too. Then, I’ll pack and send a kit, being the warehouse worker. The office needs vacuuming at some point. In the evening, if I still have time and energy, I’ll concentrate improving the software as the head programmer, wearing the propeller hat. If the day runs out, I know where to start tomorrow.


Confessions of an Facebook spammer

I announced the availability of the kit for pre-order a few days ago, and of course, I wanted to get the word out to people that might be interested about it. I set up some Facebook ads and tried to target those to people that might be interested about it. I set the budget and let Facebook optimize the results. All looked good in the start.

A day or two later, to my horror Facebook told me that it has shown the ad in some areas of the world more than 20 times on average to single person. Auch! I certainly didn’t want to do annoy anybody, I wanted to impress, if possible. I tried to turn that down, but half a day later, I found out that it did not work. I was still spamming! I turned ads off and got professional help.

I still want to get the word out. However, nobody should now see the ad no more than once a day, if even that; just like any well behaving, self-respecting company should behave. The combination of an inexperienced advertiser and the cheapness of digital advertising can be a very annoying combination.

I spammed. I am deeply sorry and ashamed.

Credits

The basic design is based on  Barton Dring’s MakerSlide and heavily inspired by Edward Ford’s Shapeoko CNC project.

The CAD program I used first was the affordable Alibre PE. I took advantage of an update order and now use the not quite so affordable  GeoMagic Design. The cheap but very useful PE equivalent is now Cubify Design. The mechanical design files should still open in Cubify; if not, please let me know! Feel free to adapt the design to your needs.

The screenshot and drawing utility I used in the documentation is called Greenshot.

Notable suppliers for parts are MakerSlide Europe, Inventables, MISUMI, RobotDigg and StepperOnline. Many smaller parts are sourced elsewhere, too. The steel plates are laser cut at Pelaser. The profiles were drilled and cut by Asesepänliike Teräsjänne Oy.

The site is hosted by Bluehost and built with WordPress. The shop software is Opencart. I have edited the default themes on both WordPress and Opencart with Stylizer real-time CSS editor.

The software is written in C# using Microsoft’s Visual Studio Express 2013 for Windows Desktop. The video processing library used is AForge.NET.

Disclaimer: I have no other association to any of the companies mentioned other than a satisfied customer and I don’t get any compensation for the free advertisement – except a small comission if you use the Stylizer links when buying. Thank you for doing that, if you check it out and happen to like it! 🙂

What is with the green or white “laser” part trails in Assembly Instructions?

They don’t have any special meaning. I’m using GeoMagic Design to design the machine and drawing the illustrations. I like that software very much, but there are some shortcomings. One of them is that the part trail color is not user-selectable. Some cases the default white works fine, some cases it doesn’t. When it doesn’t, I draw green trails manually.

Btw, the illustrations are screenshots, where I have manually added the balloons. The screenshot utility I’m using is called Greenshot; highly recommended! The green part trails and number balloons are drawn in Greenshot as well.

(I have no association with either of the companies, just a satisfied customer.)