On this section, we’ll learn how to use and set up the vision processing algorithms.
Go back to Basic Setup tab, and click “Home XYZ” button. When the homing operation finishes, select Vision Processing Setup page, select down camera to view. Add a mark on your table to a position up and right and in sight of the camera (with “show pixels” unselected). The mark should be smallish, round dot or a circle.
Here is an image of my not-so-good homing mark, a piece of paper under a piece of tape:

All coordinates on the system will be referred to this mark. We’ll also use the mark as our first example, so let’s get going. But first, some terminology:
An algorithm is a collection of individual video processing functions. The system will process the video image using the algorithms sequentially to a video frame to get the desired result. Also, an algorithm includes information what to look for, together with size and distance for acceptable results.
A function is a single video processing function, that may have its own parameters. Examples of such functions are “invert” (makes the image a negative; no parameters) or “threshold” (turns image to pure black and white; one integer parameter for the limit value.
The algorithm setup section looks like this:
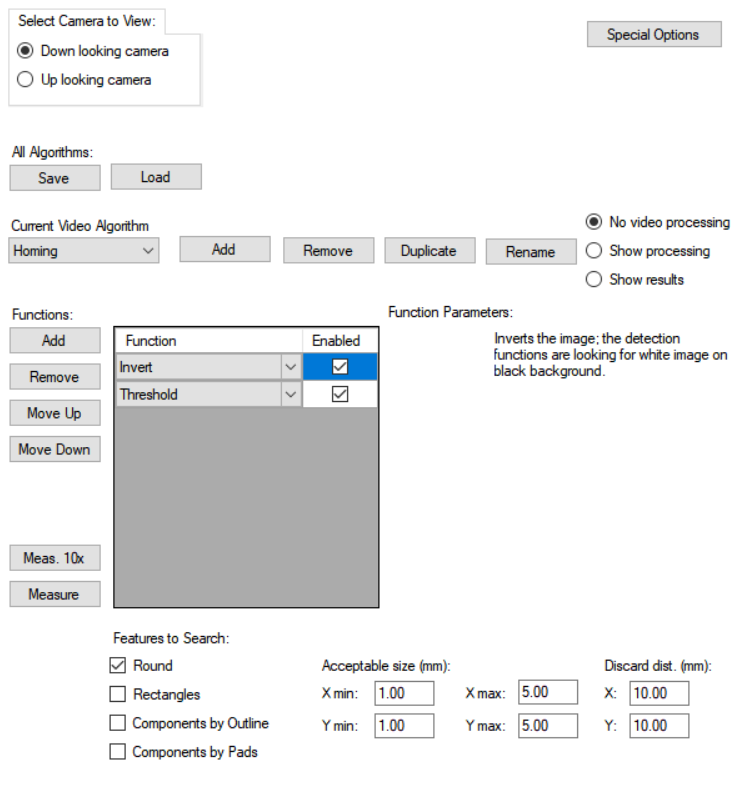
On top, you can select which camera view to have in the picture box.
You can also Save and Load all the algorithms to a file. For now, the file name is shown in the log window. It is on the todo list to have a file selection capability.
The Current Video Algorithm drop-down box selects which algorithm is currently loaded for editing.
You can Add, Remove, Duplicate or Rename algorithms, except the “Homing” algorithm.
The No video processing/Show processing/Show results selection affects to the displayed image. The “Show processing” selection shows the same image that the features recognition stage sees. “Show results” highlights the found features over an unprocessed image.
On the “Functions” section, you select which functions are used on the image. The example shown is my homing algorithm. Available video processing functions are listed in the software reference section here, with explanations.
“Features to Search” tells the recognition section what to look for. The search looks for white features on a black background. Therefore, most algorithms use the “Threshold” function: Pixels with brightness lower than the parameter value are converted to black, others come out white.
To filter out unwanted results, you set the “Acceptable size” for the result you want. When you edit the X value, the Y value changes as well – in most cases, you don’t need separate filtering for X and Y size. If you do, put the X value in first, then edit the Y value. Result candidates that are further away from the initial location than “Discard distance”, are discarded.
The “Measure” button runs the measurement routine on the image and displays the results on the log window. A deeper explanation is on this page.
Following the example on this page, tune your homing algorithm so, that you get good reliable recognition for your home mark.
Depending on your PC and the resolution you are using, delays in video stream might cause issues in getting the algorithms to work reliably. The test function described needs the homing function to work properly. On the other hand, the delay needs to be out of the way for the homing to work. Therefore, please read this page , and first set the delay to a big number. Once the true homing described below works, set the delay properly.
True Homing
When the homing mark recognition works, press the big red Home button on low center of the program window.
The machine will first run the mechanical homing function, which by now, you are familiar with. Then, it uses the video processing you just set up to get itself precisely on top of the homing mark. Please note, that the result will not be exactly 0. The software doesn’t try to get on homing mark with the resolution offered by the camera; instead it uses the result of last measurement to set the offset.
Make it your habit to press the Home button every time you start the program or power to motors is switched off. The software can prompt you for homing when it thinks the accurate position is lost. A red Home button indicates that the machine is not homed.
IMPORTANT: Homing on rotation axis
There is no automatic homing on rotation axis. Therefore, make a mark to the big pulley, and make it also your habit to manually check that it points to the same direction (to front, for example) before you turn power on. This is important for the nozzle calibration to work properly.
Previous (Uplooking Camera Setup)